{DIY Tutorial} Fabric Rosette Flip Flops

Share on pinterest
Pinterest
Share on facebook
Facebook
Share on twitter
Twitter
Flower Flip Flop 19


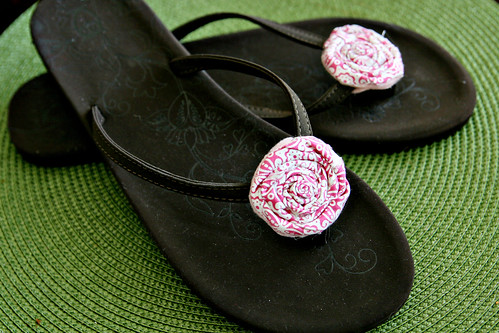
Just about the only perk of living in a miserably hot oven of a city, is that you can wear flip flops almost year round. When other parts of the country get to experience Fall (what does that look like again?), summer clothing and flip flops go on the clearance rack here in the city that never cools. I’m finally embracing Arizona’s weather, especially when that means I get to shop. I recently found a pair of boring brown flip flops in the clearance pile and thought I would do a little embellishing. This is what I came up with.


Materials

Flip Flops

Fabric

Felt

Glue Gun

Scissors

Flower Flip Flop 1


Directions

Step 1: Cut fabric into a 1.5 x 18 inch (that is 1/2 yard) strip. The longer your strip, the bigger your flower will be. I used my rotary cutter but scissors will work just fine. You can tear the fabric for a shabby chic look.

Flower Flip Flop 2

Step 2: Cut a large circle of felt (at least 4 inches wide, bigger than you want your flower to be). These will be used as the base for your rosettes. Not pictured.

Step 3: Fold the strip lengthwise and fold again. (Note to self: Must get a manicure)

Flower Flip Flop 3

Step 4: Tightly roll the folded strip of fabric to form a small bud. Add hot glue to one end and attach to the felt circle base.

Flower Flip Flop 4

Flower Flip Flop 5

Step 5: Start twisting the fabric strip in an outward motion around the bud. Add hot glue to the base and attach the twisted fabric to it. Keep going until you run out of fabric or until you’ve reached your desired flower size. Tuck the end in and glue it to the base.

Flower Flip Flop 6

Flower Flip Flop 7

Step 6: Cut away the remaining felt so the base is the same size as the rosette.

Flower Flip Flop 8

Flower Flip Flop 9

Step 7: Trace the rosette onto felt and cut out an additional felt circle. The felt circle will be the same size as the rosette and will be used as a backing.

Flower Flip Flop 15

Step 8: Add a glob of hot glue to the base of the rosette.

Flower Flip Flop 11

Step 9: Take the felt backing that was just cut and place it behind the straps of the flip flop. Attach the rosette with hot glue to the backing, sandwiching the straps.

Flower Flip Flop 10

Flower Flip Flop 14

Flower Flip Flop 12

Step 10: Repeat instructions for the second shoe.

Flower Flip Flop 18

Step 11: Enjoy your pretty new flip flops year round, if you live in Arizona. If not, you still have a few more weeks of flip flop wearing weather left to enjoy.

Flower Flip Flop 17

Brought to you by:

The Crafty Nest

Featured at:

The Girl Creative

NightOwlCraftingTip  Junkie handmade projectsJoin  us Saturdays at tatertotsandjello.com for the weekend wrap up     party!Thirty Hand Made DaysTodays Creative Blog


You Might Also Like

Leave a Reply

Your email address will not be published. Required fields are marked *

This site uses Akismet to reduce spam. Learn how your comment data is processed.

profile-pic

Hi, I'm Vanessa!

Welcome to See Vanessa Craft! I’m Vanessa, an MSSW and mom of two in Arizona, and I’m happy you’re here to get inspired with me. It’s my mission in life to spread creativity through crafts, recipes, travel and more in order to live a life well lived.

CREATIVITY IN YOUR INBOX