I recently sent 4 bloggers the same crafty materials and asked them to “Do Something Crafty”. They had 2 weeks to complete their project. They were allowed to use other materials, as long as the materials sent to them were the primary materials in the craft. You, my lovely readers, will have an opportunity to vote for your favorite blogger’s craft at the end of the challenge. The winner will receive a secret prize. Meet our first blogger, the uber crafty Nikki. Check out the creative chair top covers that Nikki crafted up.
Nikki currently lives in a small town in Nebraska where she is a mommy to two super kidlets. She’s also an award-winning newspaper columnist & photographer, a blogger, jumper extraordinaire, lover of thrifty & vintage & currently obsessed with knit graffiti. Take a peek into her world by visiting her blog, WhiMSy love.

In Nikki’s words: I was so excited when my Craft Challenge package arrived. When I opened it, I imagined floods of ideas would come to my brain. But this is what really happened: crickets chirped, echoing against the walls of my empty noggin, the wind whistled through the hollow caverns of my brain. The contents of my package included a skein of bright pink cotton yarn (pretty much pink string is what I call it), & a yard of rather bold fabric. I knew this was a definite challenge right away because, though I loved the pink string, the theme of the fabric wasn’t really my style.

Right away I decided that I would ONLY use the materials sent to me. Although I was allowed to use additional supplies or materials in this challenge, I thought it would truly be more of a challenge if I stuck with what was mailed to me.
Since knitting has become my most recent passion, I immediately thought of knitting something with the string. But then I nixed that idea because I thought about those of you who might not know how to knit. I had only just learned these crafty tricks & it’s something that takes practice, & can be frustrating at times when you’re a newbie. So I decided to craft for the simple crafter instead. I’m a fan of quick projects & wanted to create something easy to make. Something that can be made in an afternoon.
These chair top covers require some sewing, but, if you wanted to, the bulk of the stitching can be done “no-sew” with heat-n-bond tape.
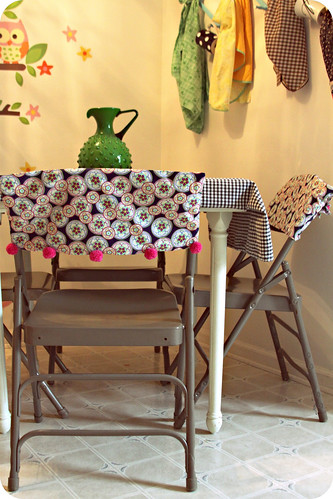
I’ve got several metal chairs around the house, & next door at the church, & they get used quite a bit for different events. But they’re not the prettiest when it comes to seating, so I thought I’d spiffy 4 of them up. That’s exactly how many chair top covers could be made from this one yard of fabric. I also used the scraps to embellish them, so I ended up having ZERO scraps leftover! Of course, you can cover whatever sorts of chairs you wanted to.

Once you create the foundation of your cover, the fun is in the embellishing! You can visit my blog for a tutorial on this project.
Instead of making all the chair covers the same, I opted to create 4 unique styles, all only slightly varying.
I whipped out 9 pom-poms one evening while watching Project Runway. I learned a really cool trick for making pom-poms that requires a fork, see here.

I had 4 equal strips of fabric leftover. I left them in their raw state when stitching them as embellishments onto the fabric covers.
Chair cover #1 got a little rosette in the corner with one of the fabric scraps, & a pom-pom smack in the middle.
Chair cover #2 got ruffles all along the bottom edge using 2 of the fabric scraps.
Chair cover #3 got five pom-poms hand-stitched along the bottom edge.
Chair cover #4 got the last scrap of fabric stitched up the vertical center.

This project can be adapted to all sorts of occasions or holidays. (And used again & again & again!!) I even created chair top covers for a Crafty Night I lead every month, using felt. I plan on screenprinting an image on the back of each cover with white ink. It just dresses things up a little & brings everything together. It’s the little things, you know?
Stay tuned to find out what our next blogger crafted up tomorrow!