(guest tutorial) diy love shirt

Share on pinterest
Pinterest
Share on facebook
Facebook
Share on twitter
Twitter

love

I’d like to welcome Kate of Cheap Crafty Mama to my blog. She blogs about creating a lot out of a little. I love me a bargain crafter! Check out her Kid Artwork Greeting Cards tutorial and Flowery Fleece Headbandtutorial for some craftspiration. She’s spreading some love on my blog today. Literally, she’s showing us how to make a LOVE shirt and she’s giving one away to one lucky winner (in your size of course). Open up the post and scroll all the way down to the bottom to enter this handmade giveaway.

Hi! I’m Kate from cheapcraftymama.com. I’m so excited to get to be guest-posting here at The Crafty Nest because it is one of my favorite blogs to read and I feel like I have a lot in common with Vanessa! I love to create things (crafts, gifts, home decor, food, and kidcrafts) so I started my blog to share my passion for creating with others! I am a former decorative painter turned stay-at-home-mom and I absolutely love getting to spend every day with my 17 month old son (and I’m looking forward to welcoming another baby this summer!)

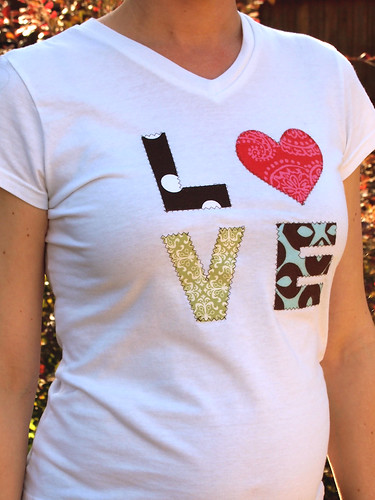
Today I’m going to show you how I made this cute “Love” T-shirt. It’s very easy to make (I’m including a no sew-version too if you’re not a sewer) and I was able to make it for free since I already had the supplies on hand. If you love this shirt and want to have one just like it for you or your little sweetie, you are in luck because I will be giving one away!


Materials

T-shirt
4 scraps of fabric
1 sheet of applique (I use Lite Steam-A-Seam2)
permanent marker
scissors
(optional) sewing machine & thread

Directions
Step 1: Cut your applique paper to the size you want your “Love” to be. Then draw the letters on the applique paper.

*The applique paper consists of 3 layers: a double-sided sticky layer surrounded by 2 waxy layers of paper. One of the pieces of waxy paper sticks on better than the other one, this is the best side to draw on.

Step 2: Cut the letters apart. Remove the less-sticky side of waxy paper and stick the applique paper onto the back of each piece of fabric.

When you are making the “L” and “E” you will need to do one extra step because the image is going to be reversed when it goes on the shirt and you don’t want your letters to be backwards. Turn the letter over and trace the lines onto the less-sticky side of waxy paper. Then you will take off the other side of waxy paper and stick the applique on the back of the fabric you want to use.

Step 3: Cut out the letters and heart.

Step 4: Remove the waxy paper backing (and now your appliques are like pretty stickers!)

Stick them to the shirt wherever you want them to go.

Step 5: Iron the appliques (with the iron on a “cotton” setting) for 15-20 seconds.

Step 6: The appliques are on your shirt permanently now so you can be finished if you’re not the sewing type. I like to do some zig-zag stitching around the edges because I think it looks cute! Another option is to use puff paint around the edges- little dots would be cute!
Step 7: Now you’re done, go spread some love!

Pin It

Win It:

Cheap Crafty Mama is giving away a handmade LOVE shirt (winner’s choice of size, child or adult) to 1 lucky winner. This giveaway is open to US residents. This is a rafflecopter giveaway, you must open up the post for the widget to appear. The first entry is mandatory, the rest are extra ways to enter. Remember to leave an email address and good luck!


a Rafflecopter giveaway
Brought to you by:


Linking up at:
Tip  Junkie handmade projectsJoin  us Saturdays at tatertotsandjello.com for the weekend wrap up     party!Todays Creative Blog

ButtonThe Girl CreativeThirty Hand Made Days

You Might Also Like

Leave a Reply

Your email address will not be published. Required fields are marked *

This site uses Akismet to reduce spam. Learn how your comment data is processed.

profile-pic

Hi, I'm Vanessa!

Welcome to See Vanessa Craft! I’m Vanessa, an MSSW and mom of two in Arizona, and I’m happy you’re here to get inspired with me. It’s my mission in life to spread creativity through crafts, recipes, travel and more in order to live a life well lived.

CREATIVITY IN YOUR INBOX