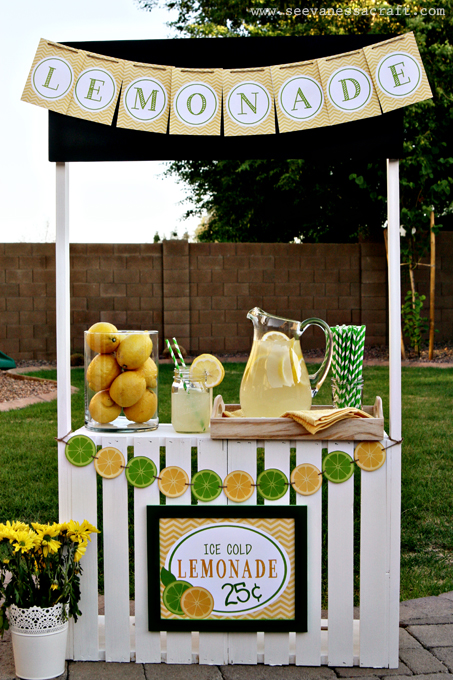
I’m excited to be a virtual summer camp counselor, along with 7 other creative bloggers (Melissa from Mama Miss, Jenae from I Can Teach My Child, Lauren from Tutus & Tea Parties, Jodi from Meaningful Mama, Asia from Fun at Home with Kids, Megan from Coffee Cups and Crayons , Mari from Inspired by Familia), for Disney/Babble this year. The camp counselors will take turns featuring a kid-friendly craft or activity each week on our own blogs and you can link up your own summer projects here (you might even be featured by Disney/Babble). For my summer project, I worked with my dad on building a DIY crate lemonade stand for my almost 3 year old. The crates were just the right size for him (he’s even on the tall side) and he has been having a blast using this stand for pretend play. He takes my order, tells me it’ll be 20 bucks and asks me “cash or credit”. This is apparently a fancy lemonade stand, way out of my price range. Once it cools down a bit here in 110 degree Arizona, I think we’ll sell lemonade during our community yard sales. I know he’d love making a little change for his piggy bank! Oh and I highly recommend looking up “The Duck Song” on You Tube while creating this stand, you and your kiddos will get a good laugh!
Materials
2 Unfinished Wood Crates (12.5 x 18 x 9 3/8 inches)
2 48 inch Long Boards (1 1/2 x 3/4 inches thick)
4 16.4 inch Support Boards (1 1/2 x 3/4 inches thick)
1 27 x 9 inch Board (3/4 thick)
Nails & Hammer
White Exterior Paint (quarter gallon)
Chalkboard Spray Paint
Green Spray Paint
White Frame (8 1/2 x 11 inches)
Paint Brush
Painters Tape
3m Outdoor Tape
Lemonade Stand Printables (mine are from The Perfect Card)
Instructions
Step 1: Nail the 2 crates together, placing the 4 16.5 inch support boards inside the crafts in the 4 front corners.
Step 2: Nail the 48 inch boards to the sides of the crate as shown in the photo. Nail the 27 x 9 inch board in front of the 48 inch long boards as shown in the photo.
Step 3: Use painters tape and trash bags to cover around the 27 x 9 inch top board and spray paint with chalkboard paint. You could also spray paint this board before attaching it to the lemonade stand posts. Allow to dry and remove tape/wrapping. Paint the remaining stand using white exterior paint.
Step 4: Spray paint a 8 1/2 x 11 inch frame green. Place a lemonade stand printable inside and attach to the front of the stand using 3m outdoor tape.
Step 5: Decorate stand using printables from The Perfect Card. You can also use chalk to write “Lemonade” and prices on the chalkboard painted sign. The lemonade stand is ready for customers!


Check out my healthy lemonade recipe and link up your own summer projects here!


14 Responses
It looks awesome! We are building a rootbeer stand for Mason’s Wreck it Ralph party this week. I think you convinced me to paint it white with a touch of chalkboard! Congrats on writing for Babble!!
Thanks Kelsey! I can’t wait to see what you come up with for Mason’s Wreck It Ralph party, such a fun theme! A rootbeer stand is going to be adorable!
this is so cute and such a great idea! so sweeeet!
Thank you Kelly! Logan loves it 🙂
I absolutely love this!!! I may need to hire the husband to make one for Chistopher. 🙂
Yes! Your kiddos will love it!
This is beyond adorable. How could anyone pass up the opportunity to support such a cute business and cutie pie! Thanks for sharing- this is a great idea.
Thanks so much for stopping by Rebecca 🙂
This is absolutely adorable!
Thank you Alicia 🙂
I think this is the cutest lemonade stand I’ve ever seen. Very nicely done!
this is such a great idea
I just stumbled upon this DIY. I have to say, great job and genuis! I love that it is a soooo much more affordable idea and yet seems like a very easy project to do. Love this! Great job! I think I’m going to make a version of this to go with my sons grocery market that I’ve been trying to throw together. Thanks 🙂