See Vanessa Craft

A Life Well Lived: Crafts, Recipes, Parties, Home, Travel

  • Email
  • Facebook
  • Google+
  • Instagram
  • Pinterest
  • Twitter
  • YouTube
  • Home
  • About Me
    • Contact
  • Recipes
    • breakfast
    • dessert
    • main dish
    • healthy recipes
  • Crafts & DIY
    • crafts
    • edible crafts
    • gift ideas
    • printables
    • diy
    • home decor
  • Parties
    • children’s parties
    • birthday parties
    • baby showers
  • Holidays
    • new year’s eve
    • valentine’s day
    • superbowl
    • st. patrick’s day
    • easter
    • cinco de mayo
    • mother’s day
    • teacher appreciation
    • 4th of july
    • halloween
    • thanksgiving
    • christmas
  • Travel
  • Disney
  • My Book
You are here: Home / recipes / dessert / Recipe: Royal Icing Outlining and Flooding Cookies

Recipe: Royal Icing Outlining and Flooding Cookies

June 29, 2015 By Vanessa Leave a Comment

MinnieCookies1 copy

Anytime I post about my mom’s cookie creations, like her Cowgirl Cookies or her Superhero Cookies, I get tons of requests asking for a tutorial. She’s incredibly talented, but always tell me that she wasn’t a professional baker when I ask her for a tutorial. She totally sells herself short. She recently made a batch of Minnie Mouse cookies for my Disney World trip reveal party and I finally got her to spill her secrets!

Flooding and Outlining a Cookie with Royal Icing

Royal Icing Ingredients: 

1 lb Powdered Sugar
3 Tbs Merinque Powder
1/3 cup Warm Water

You’ll also need: 

Piping Bag
Tip #2
Gel Food Coloring
Spray Bottle or dropper

Beat all ingredients at low speed for 7 – 10 minutes. Icing will form and hold peaks when it is at proper consistency. If icing is too dry use a spray bottle to add water a little at a time. Whipping at low speed will preclude whipping air bubbles into the icing.

MinnieCookies4 copy

Since royal icing is quick drying, keep covered with a damp cloth or in an air-tight container when not in use. This can be stored in a glass or stainless steel air-tight container at room temperature for a couple of days. No need to refrigerate this icing recipe since we are using meringue powder instead of fresh eggs. Icing may be rebeaten before use.

MinnieCookies5 copy

To make your Flooding Icing, separate some of your royal icing into another bowl. Add gel food coloring of your choice. Use spray bottle or dropper to add water to your icing until it thins out to a flooding consistency. I compare the flooding consistency to that of maple syrup, or liquid dish soap. Pour your icing into a piping bag fitted with a tip #2.

MinnieCookies2 copy

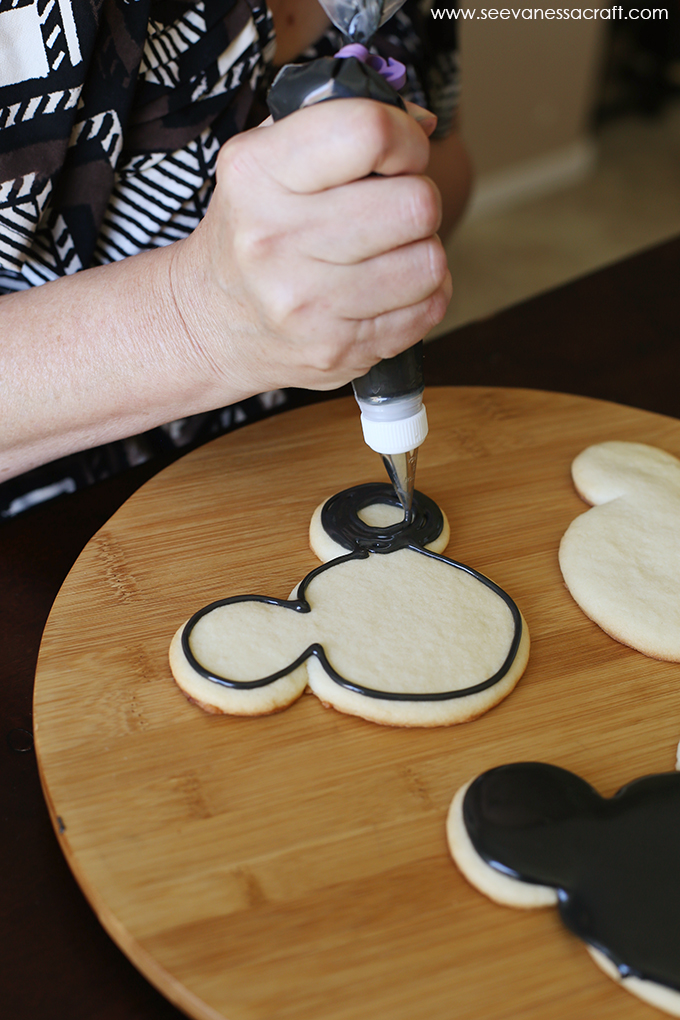
Using Tip #2, outline your cookie. Slanting your tip and not letting it touch the cookie, pull the icing along the edges of your cookie creating a border. Next, in a side to side motion fill in your border with the icing. Use a toothpick to even out the icing, move the icing it towards the edges, and pop any bubbles. Gently tap the cookie to flatten and settle the icing. It dries in about 15 seconds, so you have to move kinda quickly.

MinnieCookies3 copy

Disclaimer: I am not a professional baker. I am a self-taught grandmother inspired by my grandson who asked for sock monkey cookies for his first birthday party. Professional Bakers out there, please forgive me if my methods aren’t technically correct. This is just what has worked for me and my grandkids’ cookie requests. It’s my greatest pleasure to see their happy little faces when I manage to create something they ask for.

You might also love these other Disney inspired projects:

month of disney-1

An InLinkz Link-up


month of disney bloggers 2015

You Might Also Like

  • (recipe) extra chocolate chocolate chip cookies(recipe) extra chocolate chocolate chip cookies
  • Recipe: Chocolate Chip Coconut Cookies for SantaRecipe: Chocolate Chip Coconut Cookies for Santa
  • Recipe: Dairy Free Peanut Butter CookiesRecipe: Dairy Free Peanut Butter Cookies
  • Halloween: Oreo Stuffed Double Chocolate CookiesHalloween: Oreo Stuffed Double Chocolate Cookies
The following two tabs change content below.
  • Bio
  • Latest Posts
My Twitter profileMy Facebook profileMy Google+ profileMy Instagram profileMy Pinterest profileMy YouTube channel

Vanessa

I'm Vanessa and it's my mission in life to spread my love of hot glue guns and glitter to others. I suffer from craft ADHD, regularly working on at least 10 projects at the same time and my craft room looks like a tornado hit it. My first craft book, Party in a Jar, was published in 2014. I look forward to crafting with you!
My Twitter profileMy Facebook profileMy Google+ profileMy Instagram profileMy Pinterest profileMy YouTube channel

Latest posts by Vanessa (see all)

  • Turkey and Cheddar Sandwich Kabobs - January 8, 2021
  • Circus Animal Cookie Valentine Tags - January 7, 2021
  • Orange Themed Holiday Gift Idea - December 16, 2020
  • Christmas Blanket Gift Idea with Printable Tags - December 9, 2020

Filed Under: dessert, disney, recipes, tutorials Tagged With: Cookies, Dessert, Disney, micke, Recipe

Never Miss A Post!

« Party: Rustic S’mores Bar and S’mores Pops
Kid Friendly: Nature Walk Terrarium »

Leave a Reply Cancel reply

Your email address will not be published. Required fields are marked *

CommentLuv badgeShow more posts

This site uses Akismet to reduce spam. Learn how your comment data is processed.

Never Miss A Post!

Craft: Hulk Glitter Slime

Craft: Hulk Glitter Slime

Recipe: Lime JELL-O Salad

Recipe: Lime JELL-O Salad

Valentine’s Day: Printable Valentine Sock Gift Wrapper for Kids

Valentine’s Day: Printable Valentine Sock Gift Wrapper for Kids

(diy tutorial) valentine’s day mom tattoo shirt

(diy tutorial) valentine’s day mom tattoo shirt

Instagram

Load More...
Follow on Instagram

Find It Here

Archives

Categories

Contact Me

Have a question or just want to say hello? I'd love to hear from you! Send me an email at seevanessacraft@gmail.com
Privacy

Copyright © 2021 · Tasteful theme by Restored 316

Copyright © 2021 See Vanessa Craft · Log in

»
«