See Vanessa Craft

A Life Well Lived: Crafts, Recipes, Parties, Home, Travel

  • Email
  • Facebook
  • Google+
  • Instagram
  • Pinterest
  • Twitter
  • YouTube
  • Home
  • About Me
    • Contact
  • Recipes
    • breakfast
    • dessert
    • main dish
    • healthy recipes
  • Crafts & DIY
    • crafts
    • edible crafts
    • gift ideas
    • printables
    • diy
    • home decor
  • Parties
    • children’s parties
    • birthday parties
    • baby showers
  • Holidays
    • new year’s eve
    • valentine’s day
    • superbowl
    • st. patrick’s day
    • easter
    • cinco de mayo
    • mother’s day
    • teacher appreciation
    • 4th of july
    • halloween
    • thanksgiving
    • christmas
  • Travel
  • Disney
  • My Book
You are here: Home / tutorials / diy / DIY: Rustic Bulletin Board Frame Makeover

DIY: Rustic Bulletin Board Frame Makeover

November 4, 2015 By Shelly Leave a Comment

dark distressed wood frame title

Hey friends! I’m SO pumped to share this awesome makeover with you today! Seriously, even my sweet Mr. had doubts on this one. If we haven’t met yet, I’m Shelly from Dolen Diaries where I share my love of all things creative and creating with the ones I love. My husband and I have most of our date nights in our garage working on projects and this was one garage date night that Micah wasn’t seeing my vision right away. 

oak framed bulletin board frame before

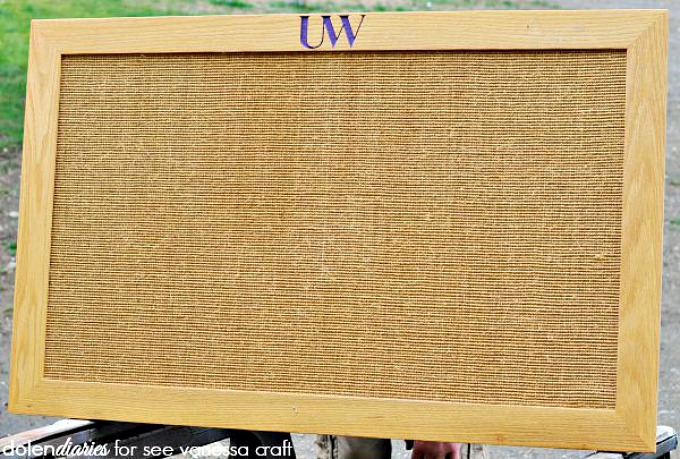
A sweet friend of mine introduced me to the local university’s surplus sale. It was pure heaven and if you get the chance you need to see if your local college has one, too! I found a couple of really cool chairs that will be receiving a makeover to be used for summer entertaining. Oh man do I have plans for our deck! Summer just ended and I can’t wait to get her back so I can make my outdoor entertaining dreams come true! But back to the bulletin board…I found this guy along with 40 of his friends in a huge box. They all had this really cool woven material for the actual bulletin board part and I thought it would be perfect for displaying the boy’s artwork in the playroom. The only problem was…

engraved bulletin board

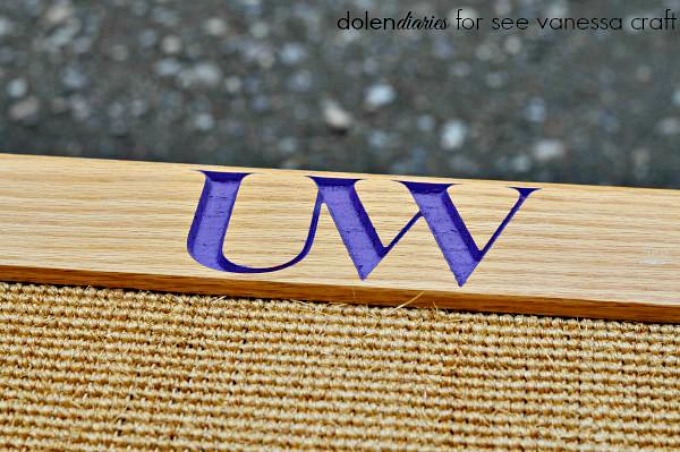
This super deep UW etched in the top of the board. I love the U as much as the next girl but this wasn’t part of my design plan. I figured I could skin it with something cool to cover that up and for $10 I was pumped about the potential this bad boy had. 

using an angle grinder to distress wood

The bulletin board sat in our carport for a month, no joke. I had shared my idea with Micah and he was sure we could figure something out using just the frame that was already there. Finally with a stroke a genius he had the idea to use the angle grinder to grind down the UW. I was totally sold on a Rustic Bulletin Board Frame Makeover but knew he would have to be in charge of the angle grinder. It’s a legit scary piece of machinery as in this isn’t a beginner’s friend. So if you are a beginner ask around and see if someone has one and would be willing to do this part for you. If you don’t have access to an angler grinder try using a hammer and dent the thing up!  

angle ground wood

Micah ground the face of the frame leaving all kinds of amazing character. 

beat up then sand the wood smooth to the touch for family friendly distressing

Next, I used an orbital sander and sanded, and sanded, and sanded…this part took a little while and I was COVERED in sawdust! I had been making some zucchini bread and popped out of the kitchen to sand while it baked. Note to self do not wear a kitchen apron with pockets out to sand. It took a few goes with the air compressor to blow all of the sawdust out of the pockets. 

tape and mask off before you stain

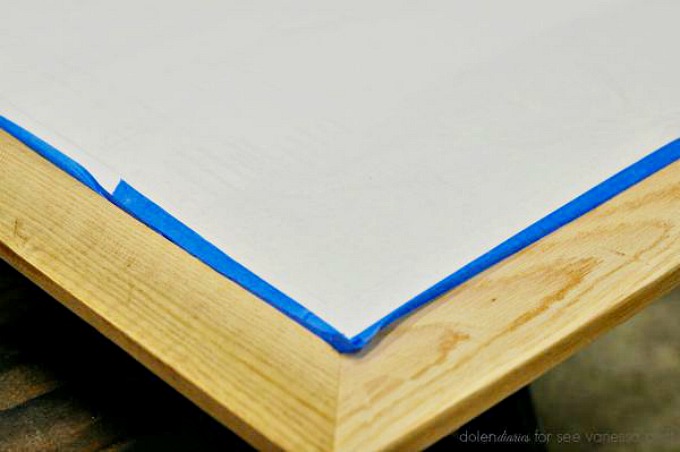
After sanding any piece we always like to thoroughly blow it the dust off with the air compressor then wipe it off with a cloth. Once the bulletin board was dust free, I masked and taped off the center of the bulletin board just leaving the frame exposed. 

distressed wood stained with an ebony stain

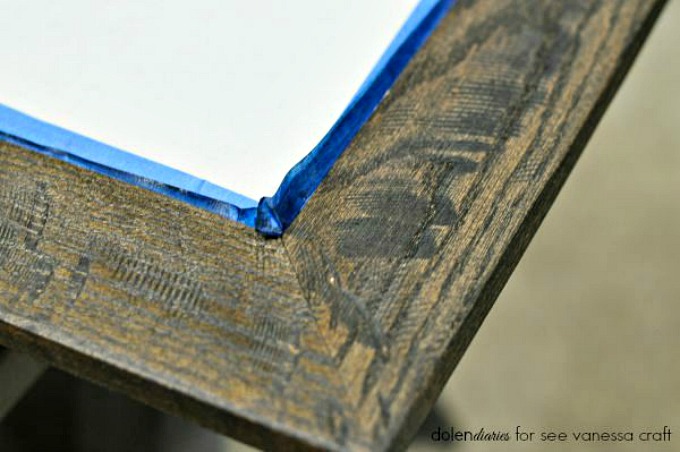
I used Minwax stain in ebony because I knew the grooves in the wood would really pop with the darker stain. Once the stain dried, we sprayed it with a clear coat to protect the finish. 

dark distressed wood frame

We’re both totally obsessed with how our Rustic Bulletin Board Frame Makeover turned out! In fact, I’m going to go back to the surplus sale with the hope that I’ll be able to pick up two more bulletin boards. I’d like to have one for each of our boys to put their own work on since they all love to draw and do projects for display. 

Rustic Bulletin Board Frame Makeover with watermark Collage

Check out these other DIY projects:

Add a bit of farmhouse flair to your bedroom with a diy vintage door headboard

 DIY Vintage Door Headboard

DIY Water Spigot Handle Hook

 DIY Water Spigot Towel Hook

You Might Also Like

  • DIY: Reclaimed Wood Utensil CaddyDIY: Reclaimed Wood Utensil Caddy
  • DIY: Rustic Living Room Makeover Mood BoardDIY: Rustic Living Room Makeover Mood Board
  • DIY: Coral and Aqua Bathroom Makeover Mood BoardDIY: Coral and Aqua Bathroom Makeover Mood Board
  • DIY: Coral and Aqua Bathroom MakeoverDIY: Coral and Aqua Bathroom Makeover
The following two tabs change content below.
  • Bio
  • Latest Posts
My Twitter profileMy Facebook profileMy Google+ profileMy Instagram profileMy Pinterest profile

Shelly

Hi, I’m Shelly and I blog over at Dolen Diaries where I share a little this and that….DIY & craft projects, kids crafts & activities, and life as a mama to three fabulous boys. I love all things creative and am blessed to have a husband who loves to be creative with me! In fact, most of our date nights are spent in our garage working on our latest projects. I can’t wait to share all of my creative adventures with you!
My Twitter profileMy Facebook profileMy Google+ profileMy Instagram profileMy Pinterest profile

Latest posts by Shelly (see all)

  • DIY: Rustic Bulletin Board Frame Makeover - November 4, 2015
  • DIY Vintage Door Headboard - August 11, 2015
  • DIY: Water Spigot Towel Hook - July 14, 2015
  • DIY: Reclaimed Wood Utensil Caddy - June 3, 2015

Filed Under: diy, home decor, tutorials Tagged With: frame, rustic wood, wood stain

Never Miss A Post!

« Craft: Easy Fleece Tie Blanket
Christmas: 40+ Handmade Ornaments »

Leave a Reply Cancel reply

Your email address will not be published. Required fields are marked *

CommentLuv badgeShow more posts

This site uses Akismet to reduce spam. Learn how your comment data is processed.

Never Miss A Post!

(diy tutorial) lucky chocolate covered oreos + free printable

(diy tutorial) lucky chocolate covered oreos + free printable

5 family fun night ideas and velata fondue giveaway

5 family fun night ideas and velata fondue giveaway

Valentine’s Day: Glow Stick Valentine Printable

Valentine’s Day: Glow Stick Valentine Printable

(printable) extra gum valentine

(printable) extra gum valentine

Instagram

Load More...
Follow on Instagram

Find It Here

Archives

Categories

Contact Me

Have a question or just want to say hello? I'd love to hear from you! Send me an email at seevanessacraft@gmail.com
Privacy

Copyright © 2021 · Tasteful theme by Restored 316

Copyright © 2021 See Vanessa Craft · Log in

»
«